Kylin M Manual
< MoreGet to Know Kylin M
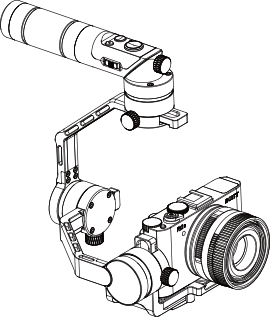
Thanks for choosing the Kylin M handheld gimbal! The Kylin M keeps your cameras steady with Snoppa’s proprietary stabilization technology. Thus allowing you to create seamlessly smooth and professional looking video.
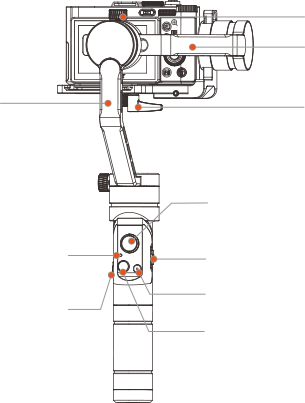
Vertical Arm
Gimbal and
camera indicator
Zoom
Thumb Screw
Horizontal
Arm
Release
plate screw
Joystick
ON(Mode)/OFF
Shutter/Record Button
2-Stage Shutter Release
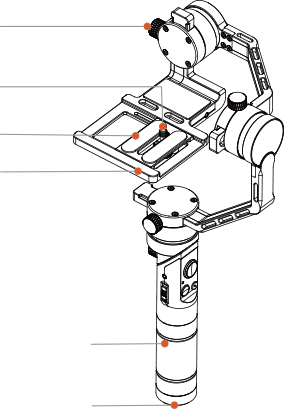
Thumb Scew
Mounting Scew
Slide Plate
Camera
Mounting Plate
Grip
1/4" Threaded Hole
How to use
Handle mode
Better for high angle filming, flexible movement
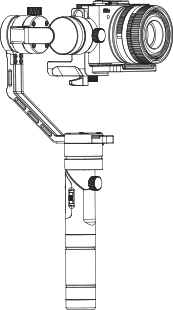
Carry mode
Better for low angle filming,
removes a majority of the weight from your arm
Battery Installation
For the first use of your Kylin M, please use the included charger to fully charge and active the batteries to ensure normal operation of the product.
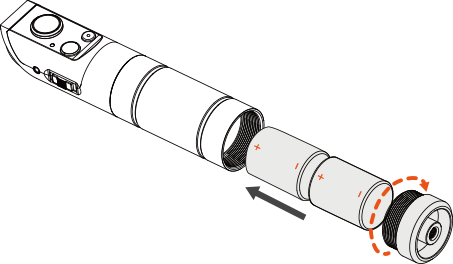
Unscrew the battery compartment and insert the 26500 batteries in the correct direction (positive/negative end), then tighten the battery compartment.
Please only use and charge batteries provided or approved by Snoppa.
Camera Installation
Mount camera on slide plate, slide camera as close as possible to tilt motor, tighten the mounting scew.
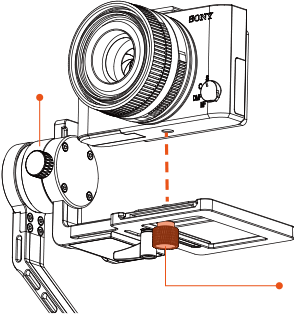
Tilt Axis
Motor
Camera
Mounting Screw
Do not turn on the gimbal without a camera mounted.
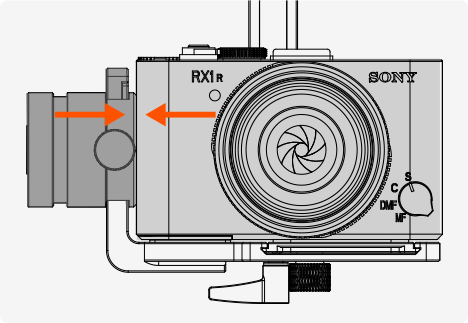
Balance Adjustment
01
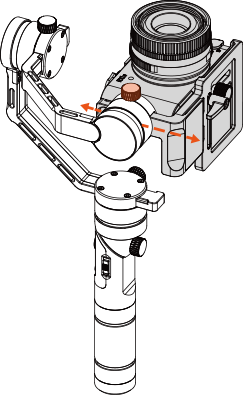
Level Adjustment on Tilt Axis: Loosen the thumb screw, slide camera forward and backward until the camera is able to lay parallel to the ground without rolling, then tighten the thumb screw.

02
Balance Adjustment on Tilt Axis: Loosen the thumb screw, adjust the tilt axis until the camera is able to stay still with the lens straight up, then tighten the thumb screw.
03
Balance Adjustment on Roll Axis: Loosen the thumb screw, hold the horizontal arm and adjust the camera position until it is able to stay still with the lens parallel to the ground, then tighten the thumb screw.
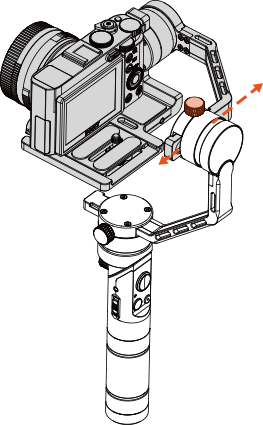
04
Balance Adjustment on Roll Axis: Loosen the thumb screw on the pan axis. Adjust vertical arm until camera is able to stay still while the vertical arm is parallel to the ground, then tighten the thumb screw.

Control Panel

Mode Indicator
Zoom
Joystick
ON(Mode)/OFF
Shutter/Record Button
2-Stage Shutter Release

Joystick:
Four-way direction control of the camera/lens.

Shutter/Record Button:
Single press to start/end video receording.

2-Stage Shutter Release:
Halfway press to activate auto focus.
Full press to take single shot.

Zoom:
Zoom in / Zoom out

ON(Mode)/OFF
Power button:
side down to turn on/side up to turn off
(single side down to turn on gimbal,
side down again to swich modes)

Mode Indicator:
Low battery-red
Normal-green
Recording-orange
Flashing indicator designates mode change
Blue-Lock Mode
Orange-Pan Follow Mode
Purple-Omni Follow Mode
Operation Mode
Powered on, slide down to swich mode
Pan Follow Mode
The camera pans left/right following the movement of the stabilizer while the tilt and roll axes are locked.
Omni Follow Mode
The camera pans and titls following the movement of the stailizer.
Lock Mode
Locks movement of all three axes to keep the camera fixed on a shooting direction.
Basic Specs
Gimbal
Working voltage
Min 6.8V | Standard 8.4V | Max 12V
Working current
220mA(Balance state of Gravity)
Working Temperature
-10°~ 45°
Product Dimensions(W*D*H)
Handheld mode:156*171*338(mm)
Carry mode:156*222.7*224(mm)
Weight
980(g)
Tilt / Roll /Pan axis mechanical rotation range
360° Free rotation
Static Attitude tracking Error
Min ±0.02 | Max ±0.05
Motion Attitude tracking Error
Min ±0.05 | Max ±0.2
Max. Payload
1300g
Battery
Type
Li-ion
Model
SP26500
Capacity
3200mAh
Charging time
3h(Charging power - 5V/2A)
Runtime
12h(Balance state of Gravity)